
There are several Specialized art and design high schools in New York City, including the Frank Sinatra School of the Arts, the the High School of Art & Design, LaGuardia High School , the High School of Fashion Industries, Brooklyn High School of the Arts and Gramercy Arts High School
Each of these schools require you to submit portfolios of you artwork
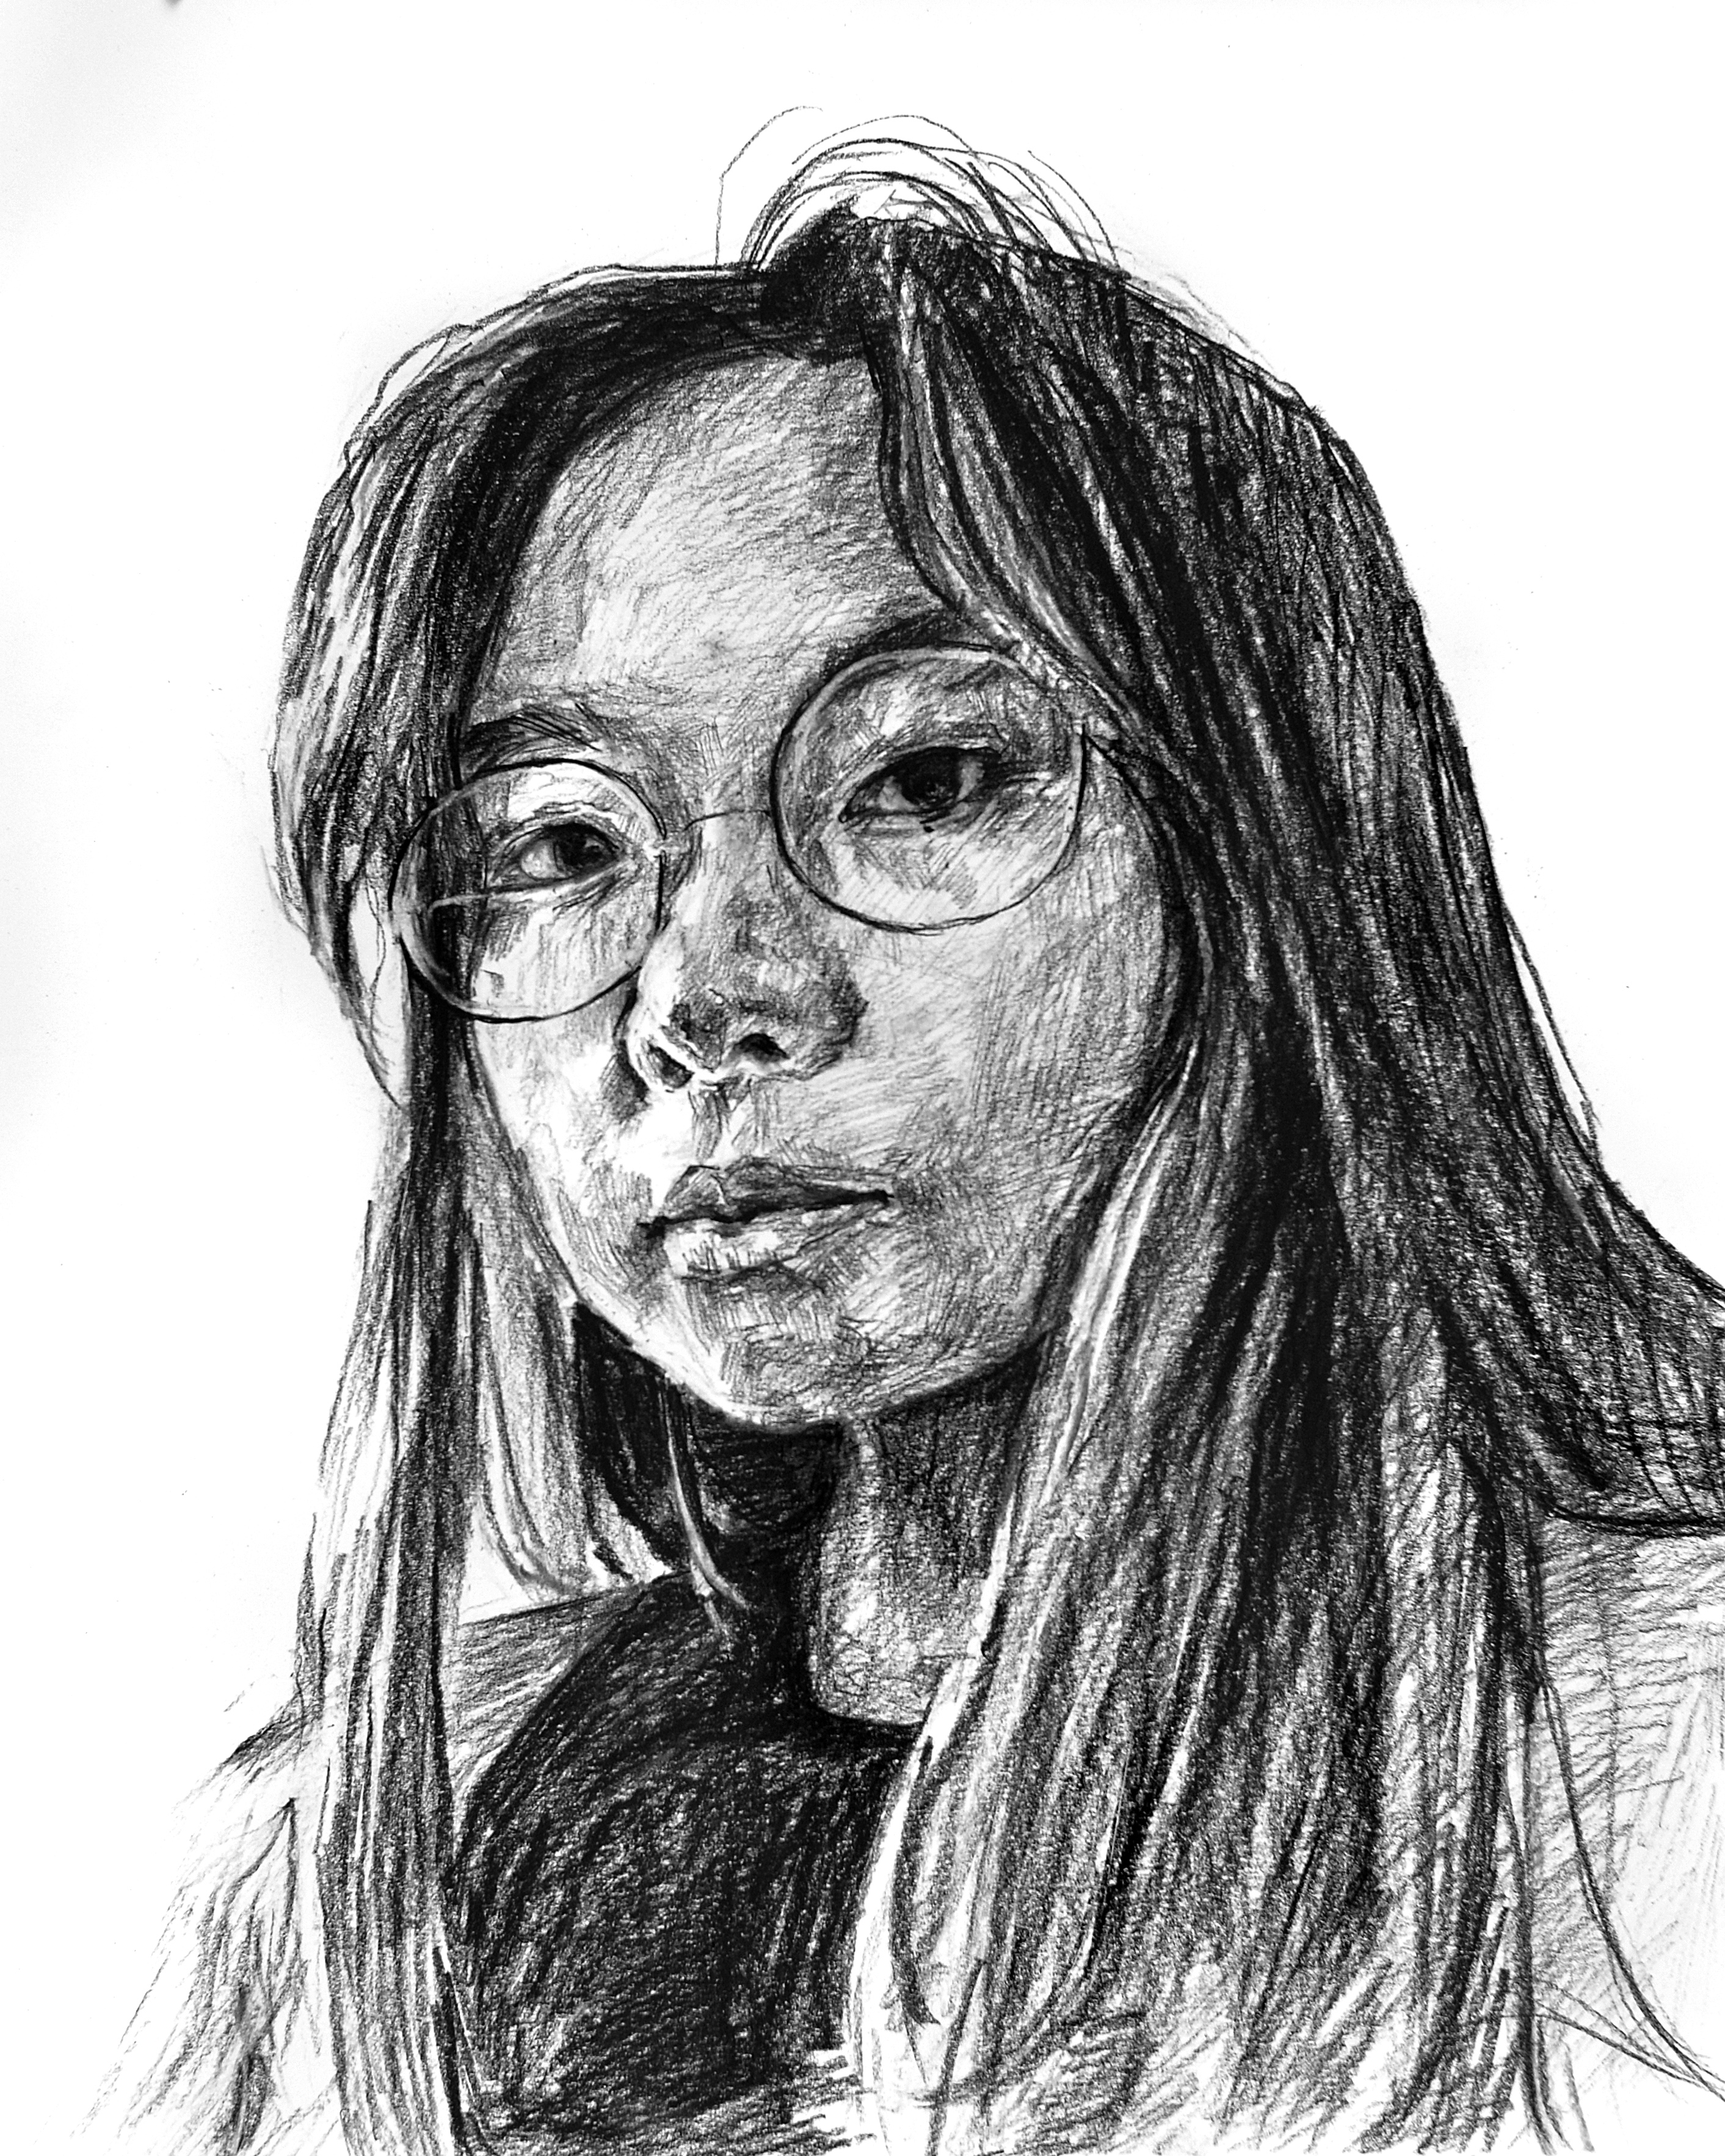
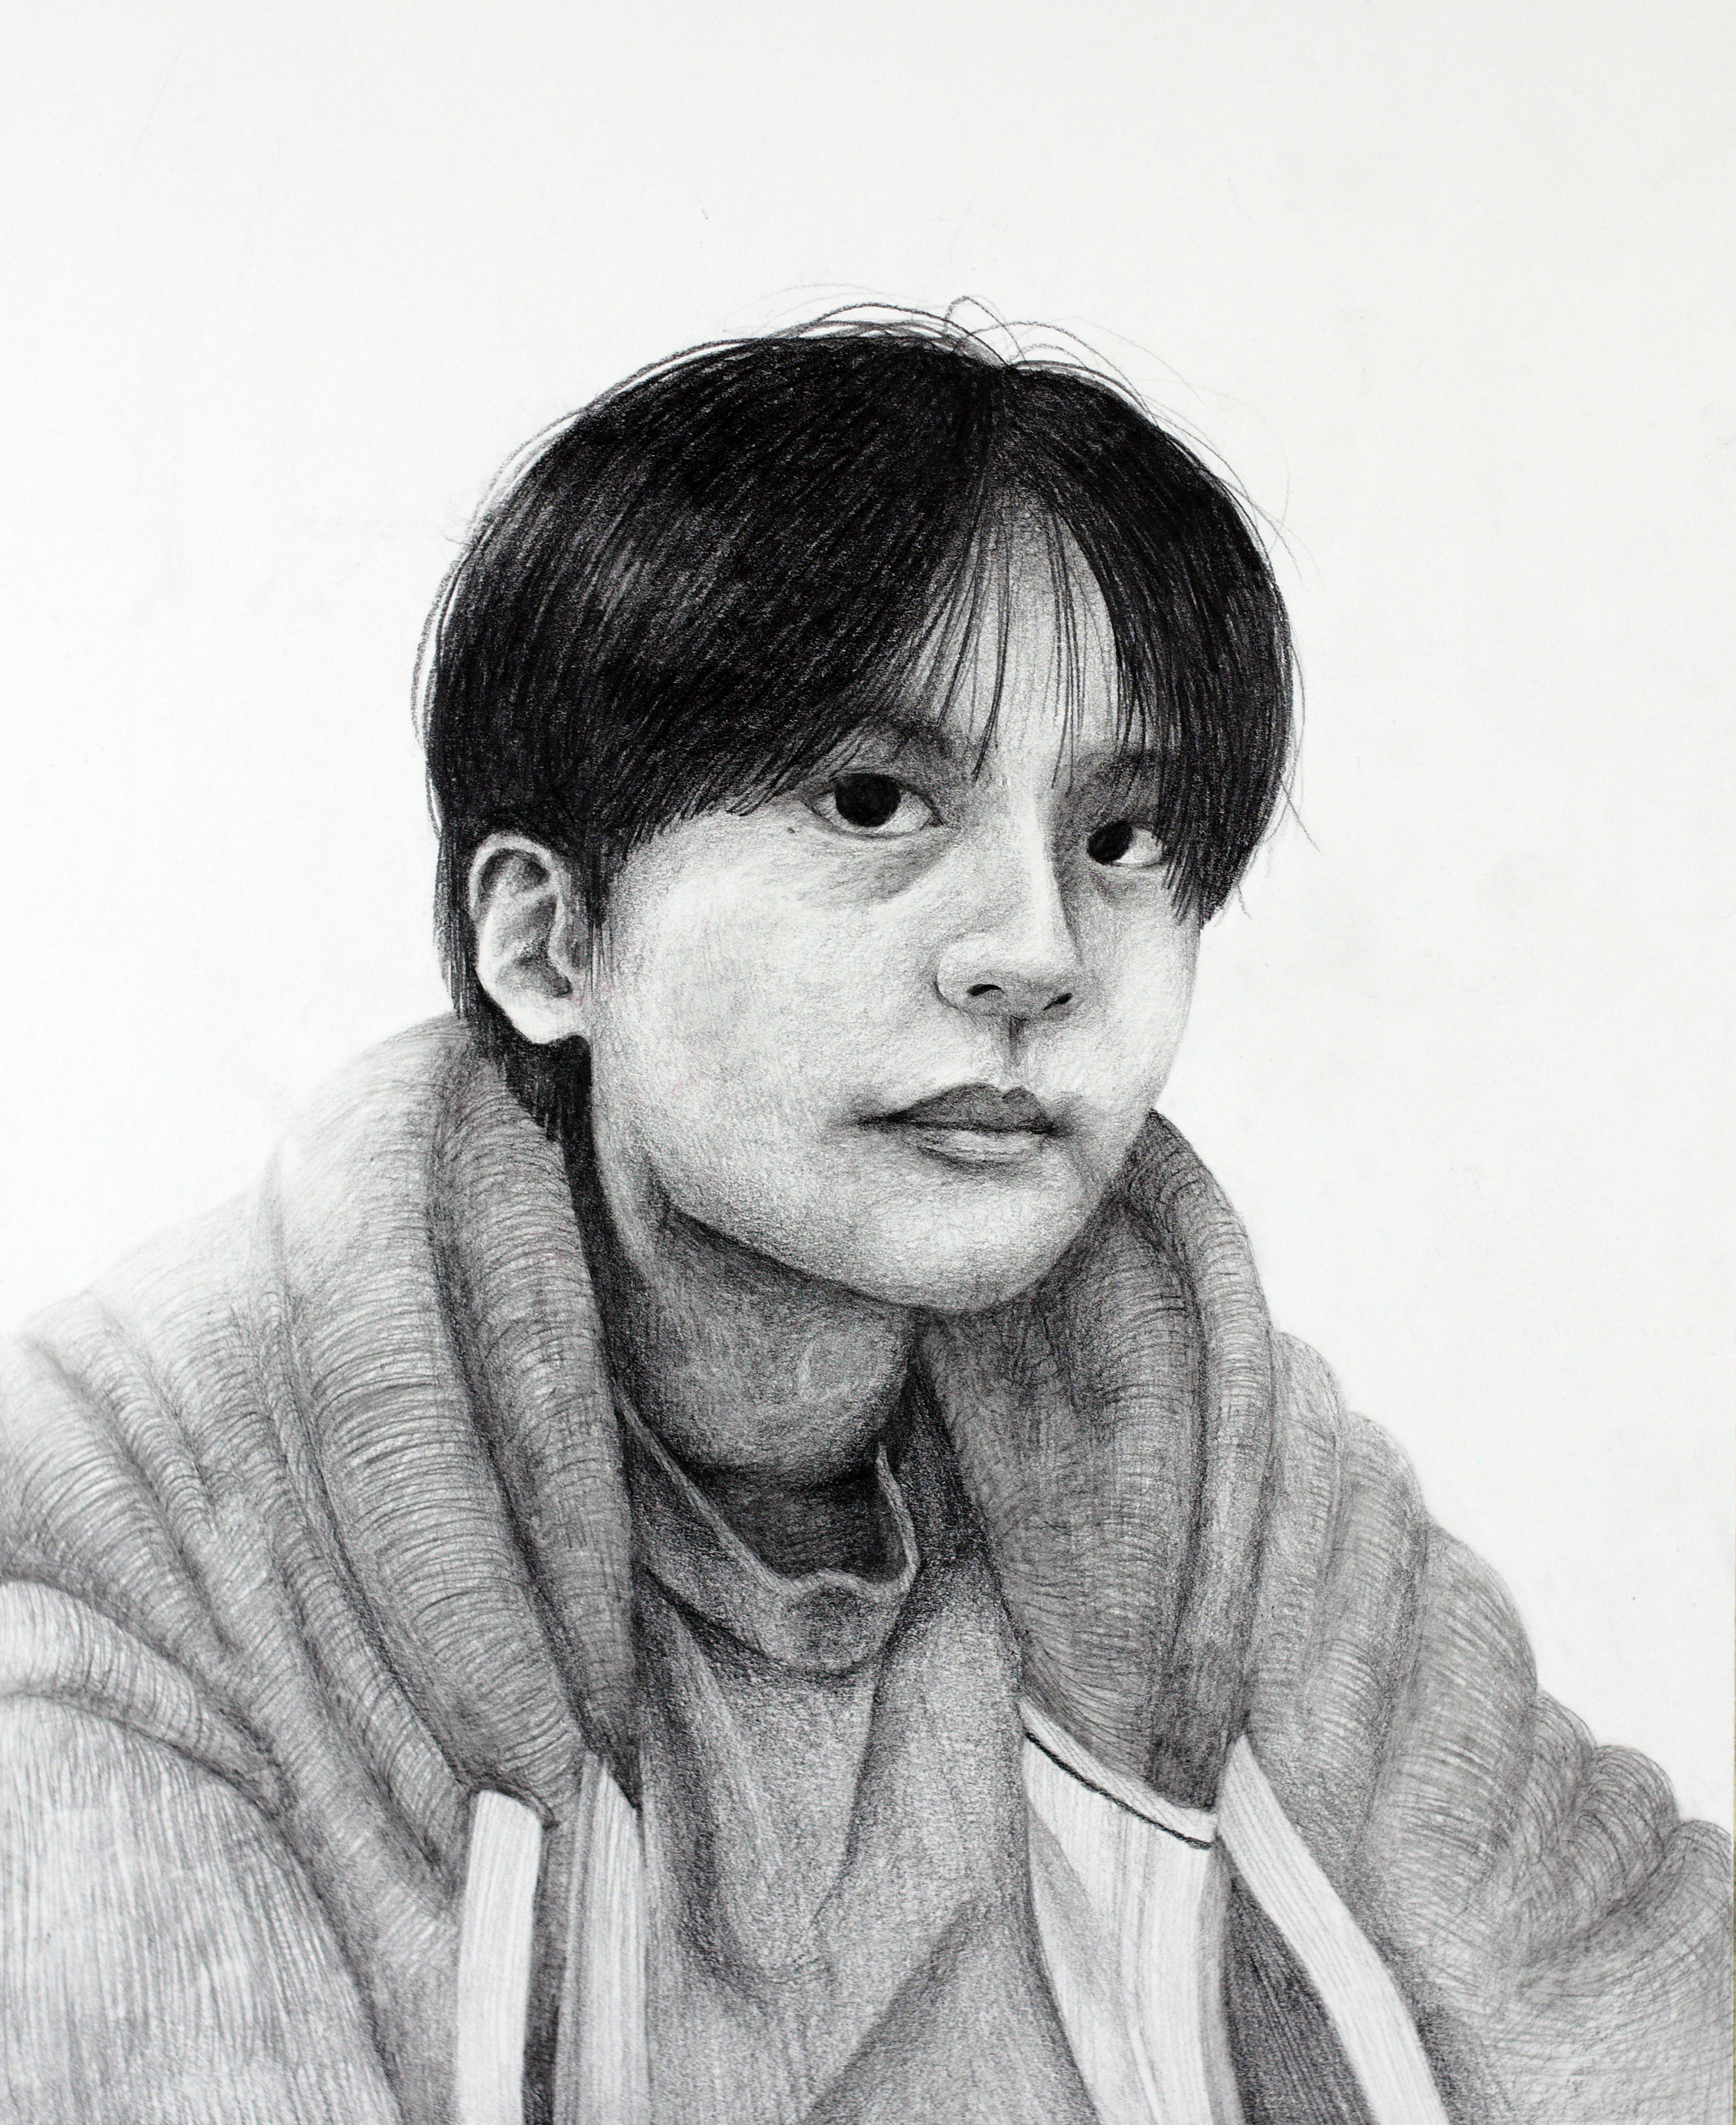
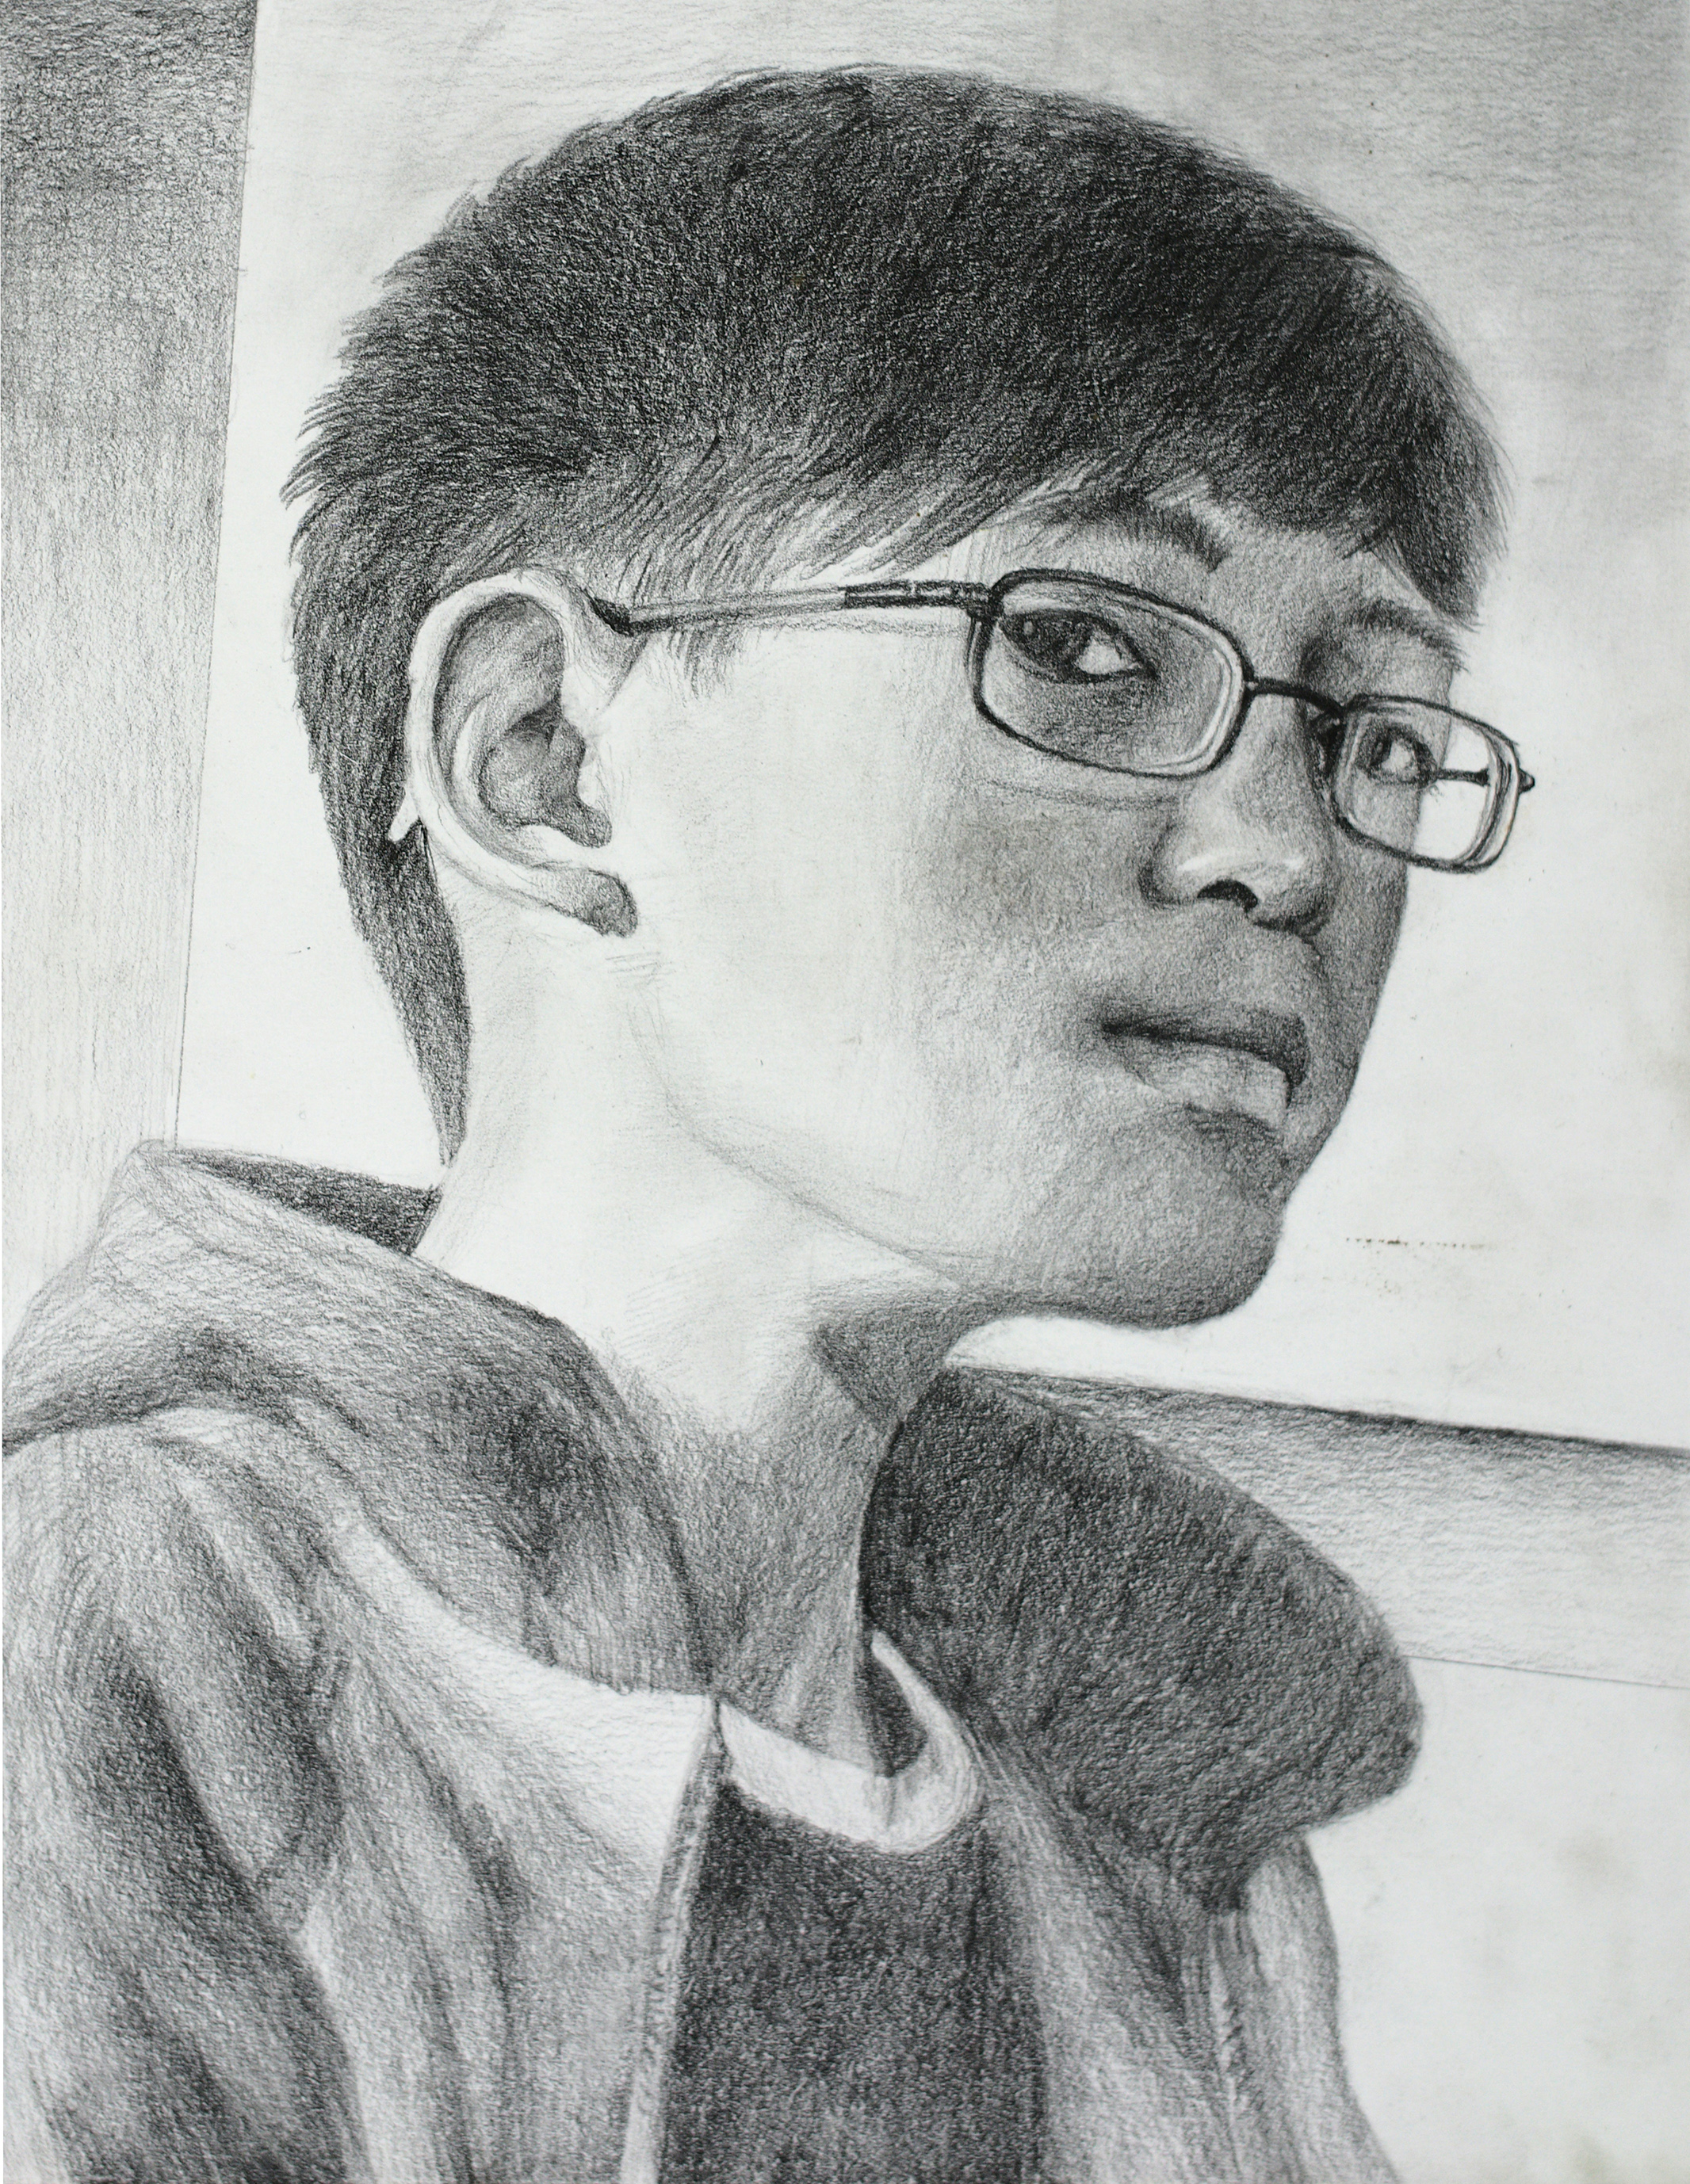
The first on the list of Art Portfolio requirements is: A self-portrait using a graphite drawing pencil and paper done from observation (from observation means you draw yourself by looking in a mirror).
These are our Top 5 Tips for drawing your self-portrait for your Art Portfolio:
1. Draw from a mirror
As with all observational pencil drawings, self-portraits will turn out best when drawn from life, and using a mirror is one of the best ways to achieve realism. Place a mirror directly in front of you and your drawing surface. (Take a photo when you have the angle and expression you like, to refer back to your position later on.) Many students use a three-quarter view- where your head is posed about halfway between front and profile views. Also, you play with the lighting source to enhance the lights and shadows you see.

2. Start with Contour Drawings
Before you start on your final Self- Portrait, warm up with a few 5-10 minute contour pen drawings. A Contour drawing is a continuous-line drawing, where you look both at the subject and the paper, moving the pen over the paper very slowly and steadily drawing an outline of the subject. A contour line drawing is essentially an “outline drawing,” that uses no shading.This is just as much an exercise of observation as a drawing exercise. When making a contour drawing look very closely for the details of your face. This kind of drawing will not appear to be perfect, but don’t avoid the imperfections because it is these imperfections that add character to a drawing, and are a sign that you are seeing more than the ‘symbol’ of the facial features we were taught as children.

3. Plan with a Light Sketch
Start your final drawing with a light sketch – using an HB pencil, lightly sketch the shape of your head, the outline of your features and your hairline. Typically, the space between each eye equals the width of an eye. The tip of your nose should line up to the bottom of your ear. The goal here is to get the proportions and placements correct. Also, pay attention here to the composition – the placement of your head on your paper, consider the space around the head, positioning the head further up the page tends to look better than dead center. A good composition can make a huge difference.


4. Spend extra time Refining your Features
Spend equal time 50/50 looking at your reflection as much as you look at the drawing.
Really look at yourself, the actual shapes of your features, don’t rely on the shapes you’ve become accustomed to drawing as symbols of “eyes”, “lips”, etc. See how each feature changes depending on the tilt and angle of the head. It’s capturing your own individual features that will make the drawing unique and interesting. Avoid hard outlines, use a light touch and add a lot of layers.


5. Add Shadows and Tones from Light to Dark
When using a graphite pencil, it is best to build up tones and shadows in layers. Use straight or rounded motions to draw on the paper, do not smudge. Start to add tones and shadows continuing with an HB pencil, then gradually use the softer/darker pencils- 2B to 6B as you progress, using the softest/darkest ones at the very final stages. Take your time and observe the shadows under your nose and eyes, lips, and neck, see where the shadows connect to one another. Also, look to see where the very darkest darks are, and the lightest lights are, and make sure there is a broad range in between.

Bonus tip- In your sketchbook- practice drawing each feature separately as well and in varying angles, closely study each part one at a time and see how they differ depending on the angle
Follow us on Instagram to see More Portfolio Examples! @ashcan.art
We’ve helped hundreds of students successfully apply to the
top Visual Arts Programs
After school, Weekend & Online Courses Year Round
Schedule a free consultation http://www.ashcanart.com
CONTACT US: infomanhattan@ashcanart.com
Online: (212)967-8101 | Manhattan (212)967-8101 | Flushing (917)563-7852 | Little Neck (718)819-0004 | Syosset (516)226-3820
New York City Art High School Requirements
- Piece 1: A self-portrait using a graphite drawing pencil and paper done from observation (from observation means you draw yourself by looking in a mirror).
- Piece 2: A still life of at least 3 items, using a graphite drawing pencil and paper done from observation (from observation means you draw objects placed before you on a surface in front of you).
- Piece 3: A figure drawing, using a graphite drawing pencil and paper. You may pose a friend or a family member in front of you. Draw the human figure from observation (from observation means you draw a live person).
- Make sure you draw the entire figure and fill the page: do not cut off parts of the head or feet.
- Draw your figure with realistic proportions.
- Try to use value or lines to draw the folds on the clothes.
- Include any observed details and draw the facial features.
- Include some background elements placing the figure in a simple setting to make sure your figure does not look like it is floating in space.
- Pieces 4-7: Add 1 to 4 additional pieces to your portfolio. You may select pieces that were created using any material in any form. They may be two-dimensional or three-dimensional.
- Piece 8:If you are applying to Art and Design High School, Fiorello H. LaGuardia High School of Music & Art and Performing Art, and/or Frank Sinatra School of the Arts, submit this creative drawing. (This piece is optional for students applying to other programs.)
- Using pencil and paper, draw a FANTASTICAL SANDWICH! Use your imagination and creativity – we want to see your wildest ideas of what a Fantastical Sandwich looks like to you. Consider for the drawing: What bizarre, unusual, or creative toppings does your sandwich have? Who made it? Who is it for? When creating your Fantastical Sandwich be sure to include a background and fill the whole page. Feel free to use colored pencils if you wish. And, have fun with it!
TIP!- Select artwork that you made from observation. For example: a portrait, figure, interior, still-life, or landscape. Some artwork from imagination or memory can be included, but prioritize work from observation.
Always follow the instructions given by the school or program you are applying to for specific guidance. While individual schools may vary slightly in their requirements, these guidelines will help you assemble a competitive portfolio.

